Category: Gear Reviews

  • How To Make A Mock Scrape In 3 Easy Steps

    How To Make A Mock Scrape In 3 Easy Steps

    What is a mock scrape?

    First of all, you may be asking yourself what is a mock scrape, or how to make a mock scrape…..? In the world of “Cervidae” (the scientific name for deer), deer use a scrape to mark their territory and to promote courting activity during mating season. A “scrape” is an area where a male deer (buck) will scrape the ground with his hoof in the shape of a circle and once he has removed all debris he will urinate on the scrape and typically place a large footprint near the center of the circle area that they have scraped away.

    Some deer hunters see the value in a mock scrape to kill big deer and in this article, we will teach you how to make a mock scrape. In short, its 3 basic steps:

    • Set up a licking branch
    • Scrape ground under licking branch
    • Set up scent device to keep deer interested in your scrape.

    A natural scrape by Whitetail buck will typically be about 30 inches across in diameter. Based on the size of the animal, scrapes can get larger or smaller. As the rut or mating season for deer comes into play (this is typically in the October to November time frame but can vary depending on the region), scrapes become more prominent. 

    The reason for a natural scrape and the deer habitat is so that a male deer can mark his territory. It lets the female deer know that the buck is available for mating. If the female deer is also interested in mating she will then leave her scent at the scrape site and urinate. When the buck realizes the doe has been in the area, they will look out for one another and eventually mate when the doe is in heat.

    Why create a mock scrape?

    In terms of creating a mock scrape, this has a few positive impacts on your hunting area. One of which is that a mock scrape can lead another dominant buck to think that there is a buck in the area that he needs to worry about. As a result, he will come by this scrape that you make and also urinate there to deter other deer from coming into his territory. If done properly you can also attract those to the scrape that you make and she will intern urinate at the scrape that you make and attract other bucks to the area that may have not been there before.

    how to create a mock scrape

    Building your mock scrape:

    So let’s get down to the details and I will explain how to make a mock scrape. To make a mock scrape you need three things:

    1. Mock scrape scent
    2. A mock scrape dripper
    3. A licking branch.

    I have personally had a lot of success with the scrapes called a “golden scrape”. I will link to it on our resources page. I have also used it with the Magnum Scrape Dripper and had really good luck there as well.

    1. Finding the right area for your mock scrape

    The first thing you need to do is find an area where you think big deer may be transitioning or coming into an area for the rut. There are many places you can put a mock scrape but I would recommend trying to do it on a logging road, heavy game trail, or a shooting lane. You could also put a scrape on the edge of the field but it may experience less activity than the other options above.

    2. Creating “the licking branch”

    Once you find the area that you like you will need to find a tree nearby one of these areas and cut off a branch from another tree that is 8 to 10 feet in length. Any tree will work but I have had the most success using cedar or evergreen trees. This branch will hang 5 to 6 feet above the area where your scrape will be. You can tie it or screw it to the tree you are using. Depending on the type of tree that you are focused on you may be able to use the tree’s natural branches instead of hanging an artificial branch out over your scrape. 

    The purpose of this branch, also called “the licking branch” is to allow the buck and sometimes the doe to release hormones and scent from their facial glands that help attract other deer. But that being said the branch needs to be low enough that the deer can reach it with their face if they are looking up or slightly on their hind legs.

    3. Setting up your dripper

    Once you have this branch in place you will need to set up your set dripper typically above your licking branch where the drip or will drip onto the scrape you’re going to make on the ground below your licking branch. The magnum scrape dripper I mentioned is manufactured to only drip during the daytime. You will need to fill it up and tie it above your scrape, preferably out of reach from the deer.

    Once you’ve got that complete, You will need to get a stick or use your shoe to clear a spot on the ground to represent the scrape from the deer. I would recommend approximately 36 to 40 inches across. If possible have the scrape dripper land in the center of your scrap circle.

    Depending on the temperature your scrape set the dripper will last about three weeks, but I would recommend checking it after about two weeks just in case.

    To Sum It Up…

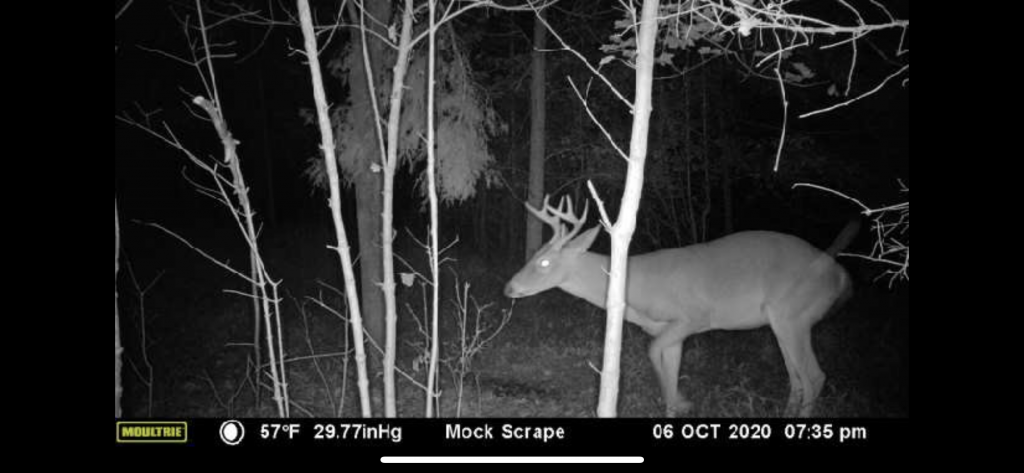
    In my experience, it only takes about 24 hours for deer to start using and checking out the new scrape. If you have a trail camera, I would recommend placing one 10 to 20 feet away to see what type of bucks are in the area you are hunting.  

    This is a great way to attract deer and one of the only ways to attract bucks without the use of corn and other feed attractants.  

    If you can afford it and have enough property I’ll recommend putting up 2 to 3 different mock scrapes in various areas around your hunting property to see what you can find. In my experience even 3 to 400 yards apart you will see different bucks at each site. 

    While you are here, you may want to check out:

    Happy hunting, and see you in the woods.

  • What is a trail camera?

    What is a trail camera?

    You might be new to hunting, or maybe you just haven’t taken the time to dig in on what is a trail camera. A trail camera is a small photo or video device used by hunters to monitor the behavior and movement of the animals within their hunting property. With the information being provided by these cameras, hunters can put together an effective strategy for hunting game.

    Why use a trail camera for hunting?

    Aside from helping you plan out your hunting approach, there are plenty of reasons why you should use a trail camera. They are as follows.

    • Lookout

    Using trail cameras will eliminate the need for you to watch the game trails deer visit, or will potentially visit. Meaning, you do not have to be physically present in the field or in the woods while trying to keep an eye on your favorite hunting property.

    • Will not scare off the game

    Trail cameras, if installed in the right location, will help you spot the game without spooking animals, or leaving scent in a hunting area.It will give you better chances of profiling the animal without worrying that it will know you have been in the area.

    • Capture better images

    Aside from recording the movement and behavior of the deer you are hunting; a high-quality trail camera will also provide you with clearer and better pictures of the animals. I don’t personally hunt over corn, but pending your state, pre-season scouting can be made really easy by adding cameras and a pile of corn in a favorite hunting area, to see what is in the neighborhood.

    • Be in many places at once

    My favorite benefit that you can get from using trail cameras is that these clever devices will allow you to be in several areas within your property at the same time. They will provide you with the best options while hunting.

    The Best Places to Put a Trail Camera

    Setting up or installing trail cameras may sound like an easy job. Technically, as long as you have a manual or you know how to operate the cameras, you can easily install them anywhere you want. Turning the camera on is a breeze, but finding a good spot for a camera is a different story. You can find more intel about “where to find deer” here. Same would typically apply for where to place a camera.

    If you want to capture as many bucks as possible, you need to put your trail cameras in strategic places within the property. For this to be possible, you must consider the season, the location, and the purpose your camera will serve in your hunting activity.

    The right camera placement will ensure that you will get detailed information about the animal you are hunting in every image that it will take. Now here are some helpful recommendations on where to put your trail cameras depending on the hunting season.

    Spring and Summer

    Spring and summer are considered the best seasons to monitor your deer herd and analyze the kinds of bucks that you will come across with when fall arrives. During these two seasons, it is best to place your trail cameras in locations where food is abundant. These places include but are not limited to soybean fields, summer flood plots, some heavily used travel trails.

    However, the best spot to set up your trail cameras during these seasons are on mineral licks and corn piles. These will give you better access to some low-impact locations like field edges. You may also consider putting a trail camera near watering holes and other bodies of water because they are heavily visited by deer when the weather is hot. This is especially true in arid/desert regions for deer.

    Fall

    Fall is the time of the year when bucks shed their velvet. This process changes the behavior and travel patterns of bucks during fall. This shift in their traveling patterns starts showing off from late summer throughout fall. During this period, it is best to move your trail cameras from their initial positions to heavily traveled trails commonly found between food sources and bedding areas. Deer become attracted to apples, acorns, and chestnut trees during fall.

    Aside from placing your trail camera in natural land pinch points, you may also put them over scrapes. The latter is situated beneath low-hanging tree branches usually frequented by bucks. Before setting up your device, make sure that you have your scent under control and that you pay close attention to exit and entry routes. Some deer are scared of foreign objects, so ensure that you don’t place your camera directly over scrapes but at least a few yards away from it.

    Winter

    Once fall is over and the deer hunting season draws closer to its end, start moving your trail cameras back to where food sources will be abundant. From being overly sensitive and hyper during fall, deer start going back to their normal behavior and will pay more of their attention back to food. During this season, your camera will give you a clearer view of how your herd is enduring the cold winter months.

    Camera Set Up

    Here are some of the things that you should remember when setting up your trail cameras.

    • The best time to set up or install your cameras is mid-day. Also, it is highly recommended to install them right after a light rain or drizzle because the wet environment will help minimize your scent.
    • Make sure to hang or strap your camera securely to its place. Ensure that it is facing the right direction where you believe the deer are frequently traveling and that it is elevated just right for the sensor to pick up the presence of the animal.
    • Always make sure that your device has fresh batteries and SD card. Buying 2 cards per camera is ideal if you don’t have a cell signal/wireless signal camera, so you can rotate the card every time you check the camera (otherwise you will need to stand there and check hundreds of pictures in a potentially prime hunting spot). Strategically place it at least facing the northern or southern direction, so it will not capture too many shadows created by the sun’s movement.
    • Check your cameras at least once every two weeks to make sure that they are in right conditions.

    Best Trail Cameras for Deer Hunting

    Choosing the right trail cameras for deer hunting is key if you want to get detailed photos of your herd and monitor their behavior. If you are still unsure of what cameras to buy, here are a few that we can recommend.

    Moultrie Cell Camera – 6000

    what is a trail camera - moultrie 6000 cell camera review

    If you want an excellent cell / wireless camera at an affordable price, the Moultrie 6000 Cell Cam is the right choice for you. This camera has served me well for a long time. Exceptional battery life, even using cell signal. Great quality pictures both day and night. Easy to set up! Moultrie also has an awesome app for their cameras, with GPS and Photo Storage, tagging, and animal ID features. This camera has a big bang for the buck. You can check price on the button above, but typically goes for less than $100.


    CAMPARK Trail Game Camera

    The Campark Trail Camera is equipped with a camera that captures 14-megapixel images and records full HD 1080P videos. It has a 0.3s trigger speed that detects movements without delay, ensuring that you will not let miss the most critical moments of the hunt. The Campark Trail Camera has excellent sensitivity and night vision which makes it the best choice if you want to monitor the herd in the dark. It is equipped with a 120-degree wide angle lens to ensure that will get a broader view of the surrounding. (Not cell ready)


    Wild Game Innovations Terra Extreme

    Last but not the least is the Wild Game Innovations entry level camera. For under $50, this little guy is a tank. Pictures are high quality, battery life is great, and works in low or no lights too. Unlike its contemporaries, this device shoots 14MP clear images. This camera also has a sensitive range of up to 60+ feet. An added perk is you can swap SD cards from the bottom, so it wont mess up your straps. A last nice to have from this camera is the bungees are very sturdy, compared to some of the other straps available in the market.

    Key Takeaways

    • Always consider the season when looking for an ideal place for your trail camera.
    • Make sure that you did everything to minimize your scent while installing your trail cameras.
    • There are plenty of trail cameras available in the market but make sure that you buy the ones that suit your hunting property and goals.
    • Invest in trail cameras that are durable and have excellent specifications if you want to increase your chance of capturing as many deer as you can.

    While you are here, you may want to check out:

  • Best knife for skinning deer 2020.

    Best knife for skinning deer 2020.

    Aside from antlers, deer are also hunted for their tasty meat. However, before you can cook that meat and serve it to your family, you need to skin the animal first. If you believe that the challenge of hunting a deer ends by capturing the animal, wait until you get to the skinning part.

    There are two ways that you can skin a deer. Either you let a butcher do it for you, or you do the skinning yourself. Deer skinning can be quite challenging and tough for any person. But, if it is not your first time, you probably know by now that choosing the right skinning knife can make the job a whole lot easier.

    A skinning knife is a hunting tool that is mainly used to prepare the captured animal as food. Skinning or hunting knives are different from your ordinary kitchen knife because they are specially made to be extra versatile and sturdy.

    Traditional skinning knives are designed to have slightly curved blades, making them highly efficient tools for peeling the skin off an animal. However, current knives have been designed to be used not just for skinning but for boning and slicing slabs of meat as well.

    If you are thinking of buying your very own skinning knife, here are four of the best blades in the market that you must consider.

    Four Best Deer Skinning Knives

    Buck Knives 119 Special Fixed Blade Knife with Leather Sheath

    The model 119 Special Fixed Blade Knives by Buck Knives are specially designed for hunters who prefer to have the traditional solid feel of a fixed blade in their hands. The 199 model is made in the United States by the family-owned Buck Knives.

    The 119 is created from 420HC steel which boasts of excellent edge retention and corrosion resistance. It is hardened to a standard Rc 58 for you to get the best performance out of it. Overall, this knife measures 10 ½ inches with a blade length of six inches and only weighs 7.5 ounces.

    The 119’s clip blade is guaranteed to make piercing, cutting in tight places, and other detail works to be easier. Its black phenolic handle is made with palm swells for a more comfortable grip. Furthermore, the aluminum pommel gives the knife its aesthetic appeal.

    The 119 Special Fixed Blade Knife is among Buck’s list of top selling knives. It comes with a protective leather sheath with a snap fastener. The knife also has belt loops which allow any hunters to carry it safely in their belts wherever they go.

    Pros:

    • High-quality knife at an affordable price
    • Corrosion resistant steel and high edge retention
    • Simple but elegant design
    • Durable

    Cons:

    • The phenolic handle tends to get slippery under certain conditions
    • Quite heavy because of its thick steel
    • The point may break easily

    Elk Ridge Hunting Knife Two-Piece Set

    If you’re looking for an affordable but highly reliable knife to take with you during your deer hunting trip, the Elk Ridge Hunting Knife Two Piece Set is just the perfect choice for you. The set includes a gut hook skinner and a small sharp finger caper knife packed in one portable sheath.

    Elk Ridge is one of the most respectable knife makers not just in the United States but around the world as well. Its green camo hunting knife set is a testament to the brand’s mission of creating affordable and high-quality knives for hunting.

    The Elk Ridge Hunting Knife set features one straight edge blade and a gut hook blade which measures 7 inches and 6 ½ inches overall, respectively. The duo is ideal for hunters who love to stay for extended periods in the wilderness.

    The trailing point, full tang, skinning knife has a black stainless-steel blade which measures 3 ½ inches. It is equipped with a green camo ABS handle designed with finger grooves and a lanyard hole which is suitable for affixing cordage.

    On the other hand, the gut hook knife also features a 3 7/8 inches black stainless-steel blade. The deep-bellied, full tang knife has a finger hole for tighter control. The knife also has a green camo non-slip textured ABS handle and a thumb jimping at the back of the blade for firmer control.

    Both the skinning and gut knives are stored securely in a black nylon dual carry sheath. The 440 stainless-steel used in the creation of both knives contains more carbon to give the blades excellent toughness and better edge retention.

    Pros:

    • Affordable
    • Compact
    • Razor sharp
    • Comfortable grip
    • Aesthetic appeal

    Cons:

    • Sheath not durable enough to handle the sharpness of the blades
    • Handles may not suit hunters with large hands

    Outdoor Edge SwingBlaze, SZ-20N, Double Blade Hunting Knife with Rotating Skinning and Gutting Blade

    The Outdoor Edge SwingBlaze Double Blade Hunting Knife is considered one of the most innovative knives of this generation. The knife features a drop-point skinning blade on one side and a gutting edge on the other side. Its design will allow you to switch between a skinner and gutter knife in just a push of a button. It’s essentially two tools in one.

    With the SwingBlaze, Outdoor Edge combined functional design not only with the sharpest, edge-holding steels but also with advanced production and traditional craftsmanship process to create an excellent two-in-one knife for big game hunters like you.

    The SwingBlaze combi-knife is guaranteed to cut not just the skin of the deer but the meat beneath it as well. The knife is so sharp it can open games like a zipper while eliminating the possibility of cutting any internal organs inadvertently. Because it is designed to cut from the inside, the blade will remain sharp for more extended periods.

    The SwingBlaze hunting knife is crafted from Aichi AUS-8 stainless-steel, and zero quenched for better performance, excellent edge retention and hardened to 57-58 Rockwell.

    The knife’s orange Kraton handle is specifically designed to provide firmer, non-slip grip even if it’s wet. The knife comes with a high-quality nylon belt sheath complete with a Kydex insert. The SwingBlaze measures 8.3 inches overall. The skinning blade measures 3.6 inches while the gutting blade is 3.2 inches long.

    Pros:

    • Practical two-in-one knife
    • Easy to use
    • Affordable
    • Comfortable non-slip handle

    Cons:

    • Not easy to clean
    • Switching between the two blades is quite hazardous

    Buck Knives 113 Ranger Skinner Hunting Knife

    Another excellent hunting knife from Buck Knives is the 113 Ranger Skinner. This knife combines the elegance and performance of Buck’s Ranger series and the classic Buck Vanguard.  The 113 Ranger Skinner is a highly-recommended knife for skinning game.

    Just like its other contemporaries from Buck’s, the 113 Ranger Skinner is made from premium materials to make it more reliable when you’re in the wilderness. Its 3 1/8 inches drop point skinner blade is made from 420HC steel which is a standard material used by Buck Knives for its knives. This material makes the blade corrosion resistant and gives it great edge retention as well as durability.

    The 113 Ranger Skinner is optimized for skinning game. Its narrow tip and full, curved belly design allow the knife to provide smooth skinning cut that aids hunters in penetrating thick layers of skin. On the other hand, the downward angle point of the blade prevents any accidental slice through the hide from happening.

    The 113 Range Skinner’s compact built, and versatile blade makes it more functional than other skinning knives available in the market today. Not only that, the American Walnut Handle and the Brass Bolster will ensure that it will fit perfectly fit in your hand. Add to that the genuine leather sheath with integrated belt loop and you now have an ergonomically designed and guaranteed American-made skinning knife that you can carry with you while hunting.

    Pros:

    • Corrosion resistant
    • Optimized for skinning game
    • Classic and functional use
    • Ergonomic design
    • Affordable

    Cons:

    • Not aesthetically appealing
    • Not suitable for hunters with large hands

    Key Takeaways

    Your skinning knife plays a significant role in making your deer skinning task easier. When choosing the best knife to purchase, you need to take into consideration the following factors so you won’t end up disappointed.

    Our choice for best bang for the buck in this comparison would be the Outdoor Edge Swing Blaze, but there are no real bad choices in the group.

    Keep these in mind while you make your choice for your best skinningin knife choice.

    • Blade – if there’s one thing that matters most in the skinner knife that you’re about to buy, it probably is the blade. Make sure that the blade is corrosion resistant, durable, and made from high-quality steel. Substandard blades tend to get dull faster or break.
    • Handle – make sure that the handle is non-slip especially when it’s wet to avoid accidentally cutting the game in unnecessary areas, or worse, cutting yourself. Not only that, but you also need to consider the length of the handle to ensure that it will fit your hand.
    • Price – don’t be swayed by the notion that high price is equal to good quality products. Read reviews from reliable sources and customers before making your purchase. Sometimes, blade makers offer their premium knives at affordable prices.

    Also, to make sure that your knife will last longer, always remember that some hunting knives are designed and manufactured for specific purposes only. For instance, a skinner knife should only be used for skinning animals unless the manufacturer indicated that it can be used for cutting flesh or boning.